■プロキシサーバ Squid
Squidを用いてプロキシサーバを構築します。会社などの組織でプロキシを利用しているところは今でも多数あると思います。BlueCoat社のProxySGというアプライアンス製品も売りだされ、高機能でパフォーマンスが良いのですが予算があまりない、さほど高機能なものは求めておらずIPアドレスの隠蔽などが出来れば良いという方にはSquidがオススメです。
Squidはyumからインストール可能です。
# yum install squid # rpm -qa | grep squid squid-3.1.10-16.el6.i686 |
設定を編集します。設定ファイルは/etc/squid/squid.confです。
#
# Recommended minimum configuration:
#
acl manager proto cache_object
acl localhost src 127.0.0.1/32 ::1
acl to_localhost dst 127.0.0.0/8 0.0.0.0/32 ::1

# Example rule allowing access from your local networks.
# Adapt to list your (internal) IP networks from where browsing
# should be allowed
#acl localnet src 10.0.0.0/8     # RFC1918 possible internal network
#acl localnet src 172.16.0.0/12  # RFC1918 possible internal network
#acl localnet src 192.168.0.0/16 # RFC1918 possible internal network
#acl localnet src fc00::/7       # RFC 4193 local private network range
#acl localnet src fe80::/10      # RFC 4291 link-local (directly plugged) machines

# 自組織のIPアドレスを定義
acl localnet src 192.168.100.0/24

acl SSL_ports port 443
acl Safe_ports port 80          # http
acl Safe_ports port 21          # ftp
acl Safe_ports port 443         # https
acl Safe_ports port 70          # gopher
acl Safe_ports port 210         # wais
acl Safe_ports port 1025-65535  # unregistered ports
acl Safe_ports port 280         # http-mgmt
acl Safe_ports port 488         # gss-http
acl Safe_ports port 591         # filemaker
acl Safe_ports port 777         # multiling http
acl CONNECT method CONNECT

#
# Recommended minimum Access Permission configuration:
#
# Only allow cachemgr access from localhost
http_access allow manager localhost
http_access deny manager

# Deny requests to certain unsafe ports
http_access deny !Safe_ports

# Deny CONNECT to other than secure SSL ports
http_access deny CONNECT !SSL_ports

# We strongly recommend the following be uncommented to protect innocent
# web applications running on the proxy server who think the only
# one who can access services on "localhost" is a local user
#http_access deny to_localhost

#
# INSERT YOUR OWN RULE(S) HERE TO ALLOW ACCESS FROM YOUR CLIENTS
#

# Example rule allowing access from your local networks.
# Adapt localnet in the ACL section to list your (internal) IP networks
# from where browsing should be allowed
http_access allow localnet
http_access allow localhost

# And finally deny all other access to this proxy
http_access deny all

# Squid normally listens to port 3128
http_port 3128

# キャッシュディレクトリとメモリサイズを指定
# /var/spool/squid以下に200のスペースと16のサブディレクトリ
# 256のサブディレクトリ配下のサブディレクトリを作成する
cache_dir ufs /var/spool/squid 200 16 256
cache_mem 128 MB

# We recommend you to use at least the following line.
hierarchy_stoplist cgi-bin ?

# Uncomment and adjust the following to add a disk cache directory.
#cache_dir ufs /var/spool/squid 100 16 256

# Leave coredumps in the first cache dir
coredump_dir /var/spool/squid

# Add any of your own refresh_pattern entries above these.
refresh_pattern ^ftp:           1440    20%     10080
refresh_pattern ^gopher:        1440    0%      1440
refresh_pattern -i (/cgi-bin/|\?) 0     0%      0
refresh_pattern .               0       20%     4320

# クライアントおよびプロキシ情報を隠蔽する
forwarded_for off
request_header_access Referer deny all
request_header_access X-Forwarded-For deny all
request_header_access Via deny all

# ホスト名を匿名にする
visible_hostname unknown

# Apache combined形式でログを出力する
emulate_httpd_log off
logformat combined %>a %ui %un [%tl] "%rm %ru HTTP/%rv" >Hs %<st \
"%{Referer}>h" "%{User-Agent}>h" %Ss:%Sh
access_log /var/log/squid/access.log combined
|
以下のコマンドで設定ファイルに不備がないか確認できます。
# squid -k parse 2012/12/21 18:10:35| Processing Configuration File: /etc/squid/squid.conf (depth 0) 2012/12/21 18:10:35| Initializing https proxy context |
問題がなければ次のコマンドでキャッシュディレクトリを作成します。
# squid -z 2012/12/21 18:13:52| Creating Swap Directories 2012/12/21 18:13:52| /var/spool/squid exists 2012/12/21 18:13:52| Making directories in /var/spool/squid/00 2012/12/21 18:13:52| Making directories in /var/spool/squid/01 2012/12/21 18:13:52| Making directories in /var/spool/squid/02 2012/12/21 18:13:52| Making directories in /var/spool/squid/03 2012/12/21 18:13:52| Making directories in /var/spool/squid/04 2012/12/21 18:13:52| Making directories in /var/spool/squid/05 2012/12/21 18:13:52| Making directories in /var/spool/squid/06 2012/12/21 18:13:52| Making directories in /var/spool/squid/07 2012/12/21 18:13:52| Making directories in /var/spool/squid/08 2012/12/21 18:13:52| Making directories in /var/spool/squid/09 2012/12/21 18:13:52| Making directories in /var/spool/squid/0A 2012/12/21 18:13:52| Making directories in /var/spool/squid/0B 2012/12/21 18:13:52| Making directories in /var/spool/squid/0C 2012/12/21 18:13:52| Making directories in /var/spool/squid/0D 2012/12/21 18:13:52| Making directories in /var/spool/squid/0E 2012/12/21 18:13:52| Making directories in /var/spool/squid/0F |
そして次のコマンドでsquidを起動します。
# /etc/rc.d/init.d/squid start squid を起動中: . [ OK ] |
■動作確認
Squidの動作確認用プログラムsquidclientがsquidのパッケージに同封されています。このプログラムを使ってsquidの設定が正しく動作しているか確認することができます。squidclientは指定した条件で実際にsquidへアクセスします。
# squidclient http://www.google.co.jp/ HTTP/1.0 200 OK Date: Sat, 18 May 2013 10:54:15 GMT Expires: -1 Cache-Control: private, max-age=0 Content-Type: text/html; charset=Shift_JIS <以下省略> |
■透過型プロキシとしての設定
一般的にWebプロキシ・サーバを使う場合、クライアントのWebブラウザにプロキシの設定を行う必要があります。透過型プロキシはこれらの設定を行わずに利用するプロキシです。但し、クライアントの設定を行わない代わりにクライアントからのWeb通信が全てプロキシを経由するようネットワークを構成する必要があります。透過型プロキシはクライアントがWebサーバへ出したリクエストを強制的に横取りし、動作します。
![]()
透過型プロキシ・サーバとして動作するにはsquid.confの待受のポートの設定を次のように変更します。
http_port 3128 transparent |
また、透過型プロキシの設定を行った場合には、自身のホスト名を設定しておく必要があります。
visible_hostname squid.unix-power.net |
また、iptablesでフィルタリングを実施している場合は以下のルールが必要です。
iptables -t nat -A PREROUTING -p tcp --dport 80 -j REDIRECT --to-port 3128 |
■キャッシュの設定
squidはデフォルトでキャッシュをメモリ上に取得するようになっています。デフォルトでは最大256MBのデータをメモリにキャッシュします。このサイズを変更する場合、squid.conf以下の設定を実施します。
cache_mem <size> |
メモリキャッシュのどの程度の容量を消費したらディスクへ書き出し始めるか設定します。メモリキャッシュの使用量がcache_swap_highの値を越えるとディスクへ書き出し始めます。また、メモリキャッシュの使用量がcache_swap_lowを下回るとディスクへの書き出しを行わなくなります。デフォルトではそれぞれ90 / 95になっています。
cache_swap_low <percent> cache_swap_high <percent> |
メモリだけでは多くのデータがキャッシュできないのでSquidはメモリが満杯になるとディスクへの書き出す機能を持っています。この機能を使うためにはキャッシュしたデータを保管する方法を設定する必要があります。
cache_dir <type> <directory> <size> <level1> <level2> [<options>] |
キャッシュしたデータを保管するディレクトリと管理方法を設定します。<type>にはufsを指定します。<directory>にはキャッシュを保管するディレクトリを指定します。<size>はキャッシュを保管することのできる最大サイズでMByte単位で指定します。<level1><level2>ではディレクトリを作成するときに第一レベル、第二レベルのディレクトリを何個まで作成するか指定します。上記の設定を行ったらsquid -zで該当ディレクトリをフォーマットしておく必要があります。
また、下記の設定でディスク上のキャッシュするデータの最小・最大のサイズを設定します。デフォルトでは最小は0、最大は4096KBになっています。
minimum_object_size <size> maximum_object_size <size> |
■Proxyユーザ認証の設定
Proxyユーザ認証はSquidを利用するときにユーザ名とパスワードの入力を求めて許可されたユーザだけがプロキシサーバを利用できるようにする機能です。Proxyユーザ認証を利用するためにはsquid.confを次のように変更します。
#http_access allow localnet http_access allow localhost auth_param basic program /usr/lib64/squid/ncsa_auth /etc/squid/passwd acl passwd proxy_auth REQUIRED http_access allow passwd |
ユーザ情報を保管するファイルは/etc/squid/passwdであり、設定はhttpd-toolsに含まれるhtpasswdコマンドで作成することができます。以下の例は/etc/squid/passwdにtestというユーザを作成しています。
# htpasswd -c /etc/squid/passwd test New password: ***** Re-type new password: ***** Adding password for user test |
なお、上記は初めての作成なので-cオプションを使用していますが、2回目以降は-cは不要となります。
■クライアントの設定
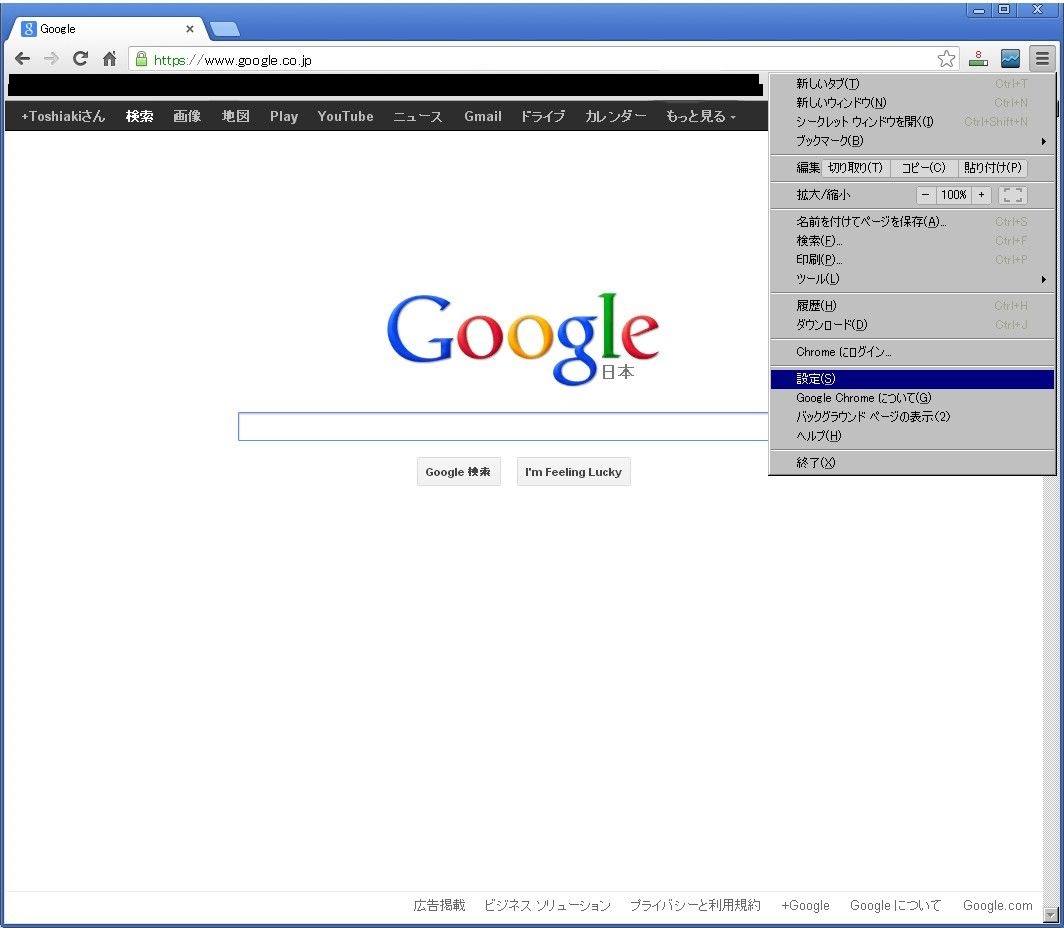
私はブラウザにChromeを使っていますので以下はChromeのプロキシを利用する設定変更です。まずメニューから設定をクリックします。
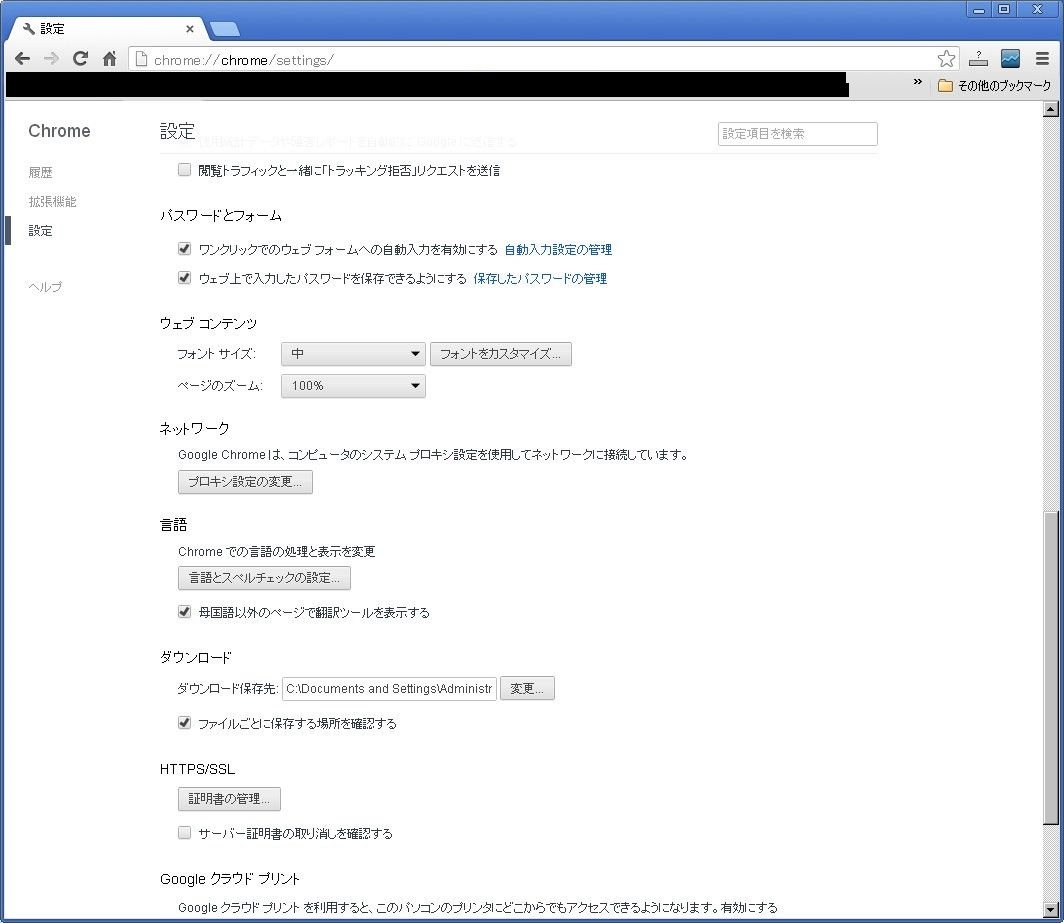
次の画面の中から「ネットワーク」-「プロキシ設定の変更」ボタンをクリックします。
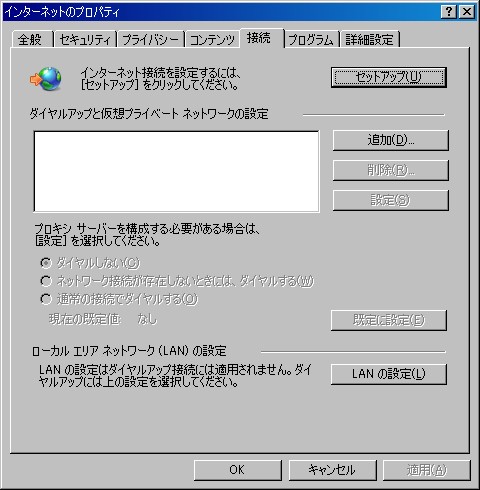
次の画面が開きますので「LANの設定」ボタンをクリックします。
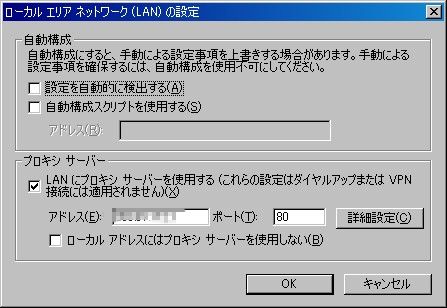
プロキシサーバのところにアドレスと設定したポートを入力してOKをクリックします。
上記の設定が終わればブラウジングしてみて/var/log/squid/access.logにもログが出力されているか確認してみてください。